Twitterfeed is Going Away – Dlvr.it is Here to Stay. Now that I got that out, let’s talk about social media automation and RSS feeds. Keeping social media accounts active is one of the most important components of having success with social media.
With that in mind, I’m going to introduce you to a great RSS feeding tool called dlvr.it. Dlvr.it is used to RSS feed posts to your social media accounts. If you just started reading this and feel like I’m speaking another language, you might want to learn what an RSS feed is and how to identify the RSS feed URL. Here’s an article I wrote about this subject to help you.
Features of dlvr.it
- Automate RSS feeds to post on social media
- Post through dlvr.it to social media
- Curate content to share on social media
Dlvr.it makes the services they offer pretty clear. Does the list above remind you of Buffer? It should, as they are quite similar. Personally, I prefer dlvr.it.
Today I will only focus on item #1 from the above list: Automate RSS feeds to post on social media.
First things first. Yes, dlvr.it has a free version and I will show you how to use it (for the most part) in this article. I have used the paid version of dlvr.it since they added the option a few years back. You’ll probably want to upgrade to it later.
With the free version you can set up three social networks to feed content to, from five RSS feeds. Once you register your free account, you are sent to a screen to set up your first feed, much like the example image below.

Setting Up dlvr.it To Post via an RSS Feed To Social Media
You can set up the feed in one of two ways.
- Use the search option. Simply type in the website name and dlvr.it will go out and comb the web to find the website you are looking for.
- Add the RSS feed URL. Personally, prefer the method of just putting the feed URL in the search box. (If you are not clear on finding the RSS feed, look at this article)
Now, I will walk you through setting up the first feed and posting to your social media account.
- Type or paste the feed URL into the search box
- Click the magnifying glass or press enter
- The name of the website you want to feed should appear
- Click the plus sign (+) to select the feed
Once you click the plus sign your screen will refresh, and it will look something like this:
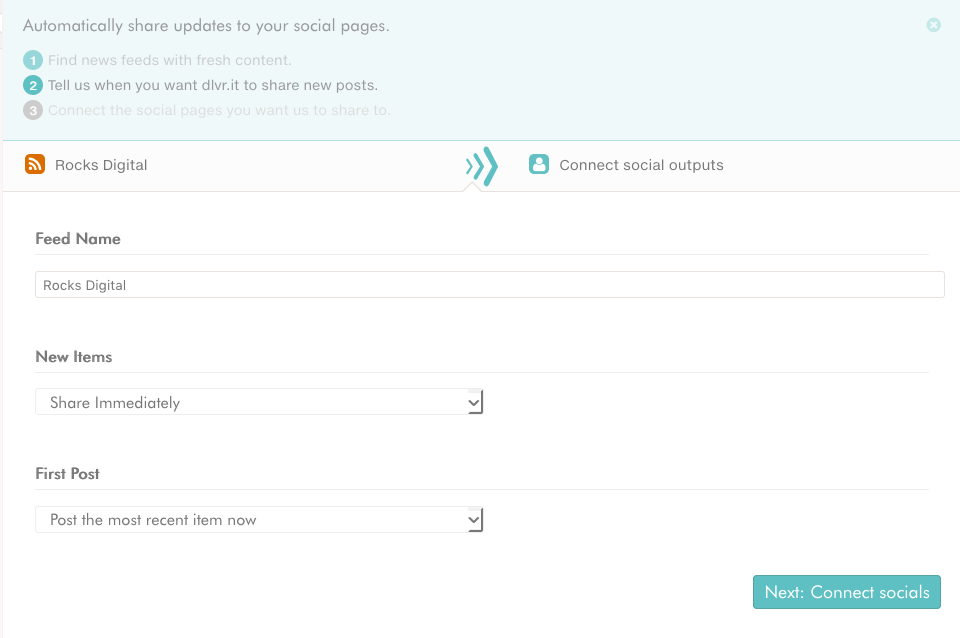
Now it’s time to customize the settings for your needs. Adding it to your queue means it is something you want to share later. I recommend you use the defaults of “share immediately” and “post the most recent item now”.
Next, click “Connect Socials”. Here you will are going to give dlvr.it access to the social media account you would like this RSS feed to post to.
As shown above, dlvr.it will post to Facebook, Twitter, Pinterest, Google+, LinkedIn Profiles, LinkedIn Company Pages, Tumblr, App.net and StockTwits. (Disclosure: I have never used dlvr.it to post to Pinterest, App.net or StockTwits, so I cannot describe how well it works on these sites, or how it appears in the feeds there.)
In this example I will set up posting to Twitter from dlvr.it via an RSS feed:
- Click the Twitter icon (upon clicking you’ll be redirected to a Twitter login screen)
- Login to Twitter to authorize dlvr.it’s access to the account
- Click “Start Posting”
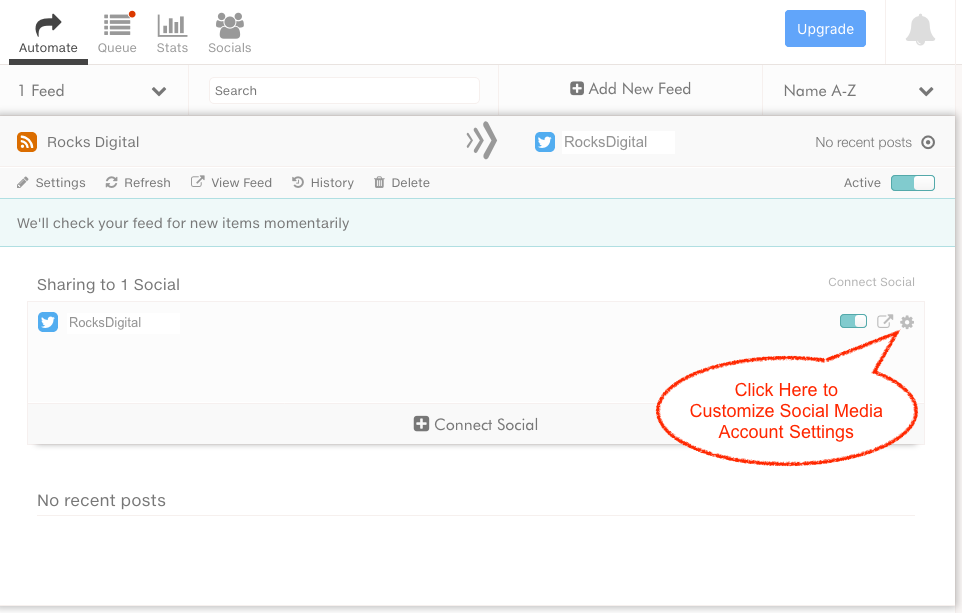
Once you click “Start Posting” you’ll be taken to a screen that looks much like the example above. If you want to customize the settings for this social media account, click on the sprocket symbol next to the social media account.
There are several custom options here that you can modify, and you will want to modify them based on the social media account you’re posting to. I’m going to zero in on three options you should consider using right away with RSS-feeding content to Twitter.
- Begin Posts With. Here you can add text in the front of the post title. An example might be “#RocksDigital News:”.
- End Posts With. Here you can add text after the post title. An example might be “via @RocksDigital”.
- Auto hashtag placement.it will determine the category the post is assigned to on the website you pull the RSS feed from, and share it as a hashtag at the beginning or end of the post.
These features are turned off by default. I haven’t yet uses the auto hashtag placement feature, but I’ll test it out. It is definitely a quick and easy way to reach a new audience with hashtags that you might not reach otherwise.
Once you get comfortable using dlvr.it, definitely check out the other settings available under this section. For example, if you are setting up to post to your Tumblr account via an RSS feed, you’ll want to enable the “Post Body” setting for the social media account. Then modify the settings setup within dlvr.it for the RSS feed itself to post the preferred content summary when the setting is enabled. (I know, I’m probably speaking Greek again. Whoops, I mean geek, but once you drill a bit more into dlvr.it, you’ll get what I’m talking about.)
If posting to LinkedIn or Facebook from dlvr.it via an RSS feed, you’ll need to adjust a few more settings for these social media accounts. Here are the steps:
- Within the post options tab, under “Post Style”, select Shared Link from the dropdown menu.
- Enable “Include Title in the Message Text Above the Shared Link”.
- Under “Thumbnail Style” select “Auto-Detected From Item Content” from the dropdown menu.
- For Facebook specifically, click on the advanced tab and make sure “Post as Photo” is not enabled. (Note: If enabled, it will post the update as an image and include a shortened link with the post title for the user to click on to access the article.)
- You’ll also need to adjust the “Post Privacy” under the advanced tab. This setting applies to both Facebook and LinkedIn.
If you’ve been following along and doing this step-by-step, at this point you should have dlvr.it set up to post to one Twitter account via an RSS feed. Plus, potentially setup a RSS feed to post to Facebook or LinkedIn. Now, you must modify the settings for the RSS feed itself in dlvr.it.
Modifying RSS Feed Settings in dlvr.it
Here you control components such as how often dlvr.it checks the RSS feed for new content, how many posts it will send out at one time, whether or not the image featured in the post is shared with the article title and link, all the way down to in which order an update is posted.
To access the settings area for the RSS feed itself:
- Click “Automate” across the top
- Click the feed title
- Click settings at the top under the feed title
The screen should look like this:
The “Detail” tab is the first tab that will appear. You can change the feed name if you want to. You can have it set up to feed to multiple social media accounts from one feed, so you probably don’t want to rename it to a specific social media account. For example, I have the RSS feed for Rocks Digital in my dlvr.it account set up to post to about 10 different social media accounts, ranging from multiple Twitter accounts to LinkedIn Profiles, Company Pages and Facebook Pages.
Make sure “feed active” is enabled if you want to continue posting from this RSS feed URL to the social media accounts you have authorized underneath it.
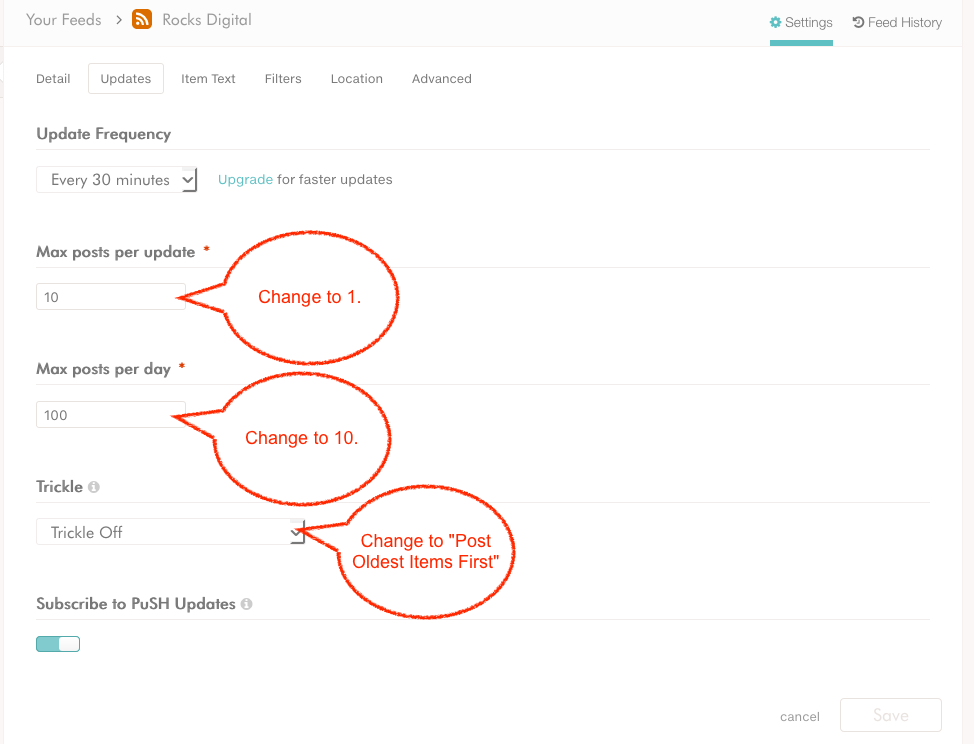
Click on the second tab labeled “Updates”. The screen should look like the above image. You will want to modify the settings for this tab.
- Change “Max posts per update” to 1.
- Change “Max post per day” to 10.
- Select “Post Oldest Items First” from the dropdown under “Trickle”.
Let me explain why I recommend these settings.
- Max posts per update. Basically, when dlvr.it checks this specific RSS feed and finds they have posted multiple new items, you only want to feed one of them at a time.
- Max posts per day. When you are RSS-feeding a blog, especially one that is not your own, you don’t want to fill up your social media feed with promoting them. One reason you are using dlvr.it to RSS-feed blogging content is to keep your social media account active while you are off doing other things, not to flood it!
- Post Oldest Items First. If you leave this setting on the default of “Trickle Off”, when dlvr.it checks the RSS feed and sees it has multiple items to post, it will only post whatever you authorized based on “max posts per update”, and anything else will be ignored. By selecting “post oldest items first” dlvr.it will post the oldest item that hasn’t already been posted. During the next update period it will post the next in line, and so on. This setting will help keep your feed active throughout the day. This is of course determined by the number of times the RSS feed is to be updated. Some blogs publish multiple times each day while others publish once a day, once a week, or only once a month.
There are two additional settings in this tab and I will highlight them now. One is “Update Frequency”. The default of “Every 30 minutes” is fine. This setting tells dlvr.it how often you want it to check the RSS feed to see if there is new content available for publishing during a specific update period. I usually change this to “Every Hour”, but this isn’t as important. The other is setting is “Subscribe to PuSH Updates”. I have turned this on and off and did not really notice a difference, so I just leave this setting at the default.
With the professional version of dlvr.it I see an extra section in the “Updates” tab that the free account doesn’t offer. This section, called “Update Window”, allows you to set up specific days and times for dlvr.it to check the RSS feed and post content.
Here’s what it looks like:
As you can see above, I have it set up to check this specific RSS feed 7 days a week between the hours of 9:30 am and 7:00 pm, and to post if something new is added. This pro feature allows you to avoid tweeting in the middle of the night so that you post during more peak times.
The third tab, “Item Text”, is similar to the “Begin Posts With” and “End Posts With” settings that are available when setting up the social media account. What’s the difference? Modifying the setting within the RSS feed instead of applying it to a specific social media account ensures the setting will apply for all the social media accounts you attach to the feed. If you completely fill in the “Prefix” and/or “Suffix” area within this tab, you would avoid completing it within the social media account settings. If you do this, you would have a duplication issue if you set both to say the same thing.
The fourth tab available is called “Filters”. Personally, I haven’t used this tab. You can use it to customize what you are sharing from the specific RSS feed. For example, if you are pulling an RSS feed from a site that blogs on all sorts of different topics, but you only want to share the stuff that has a specific set of words in it, such as “social media”, you would set up the filter. You can also set up the “Ignore items that contain any of the terms” filter if you want to exclude a specific topic. For example, I might use this setting to ignore “Trump, Clinton, Politics, Election”, since I wouldn’t want these types of items posting to my Twitter account.
The fifth tab is “Location”, and I recommend you do not turn this on as doing so could provide where you live.
The sixth and final tab under the RSS feed settings is “Advanced”. Here’s what it looks like:

This screen capture shows you what settings to select. There are three specific things I will share about this section.
- Under “Body Posting Options” make sure “Preferred Summary Content” is selected. This is a short description that pulls through the RSS feed for a specific blog post. It’s usually an excerpt that is determined when the blog is put up on the website. (This is ideal if you are RSS-feeding your website content to Tumblr or a group you admin on Facebook. It will post a teaser about the article, but not the entire article.)
- “Enable Photo Posting” must be turned on if you want the featured image on the post shared when it posts to Twitter.
- For the “Image Selection Order” be sure to have “Open Graph Tags First” selected, so the image shared with the post on social media such as Google+ and Facebook will be the featured image, versus a random image pulled from anywhere on that blog post, including the sidebar.
That’s it for the “Advanced” section. Your RSS feed is all set up and should be posting properly now, and there is one more dlvr.it setting I want to go over with you.
Setting Up dlvr.it To Use Your Preferred URL Shortener
Here you will tell dlvr.it which URL shortener to use when posting to the social media accounts you authorize. (Keep in mind, shortened URLs do not appear when posting on Facebook, etc., so this applies mainly to Twitter.)
To access the settings area for this feature:
- Click “Socials” across the top
- Click “Short Links” on the left
- Click “Add a Shortener” on the top right
Select your preferred URL shortener from the dropdown and then walk through the authorization process. The screen capture below shows what settings to select:
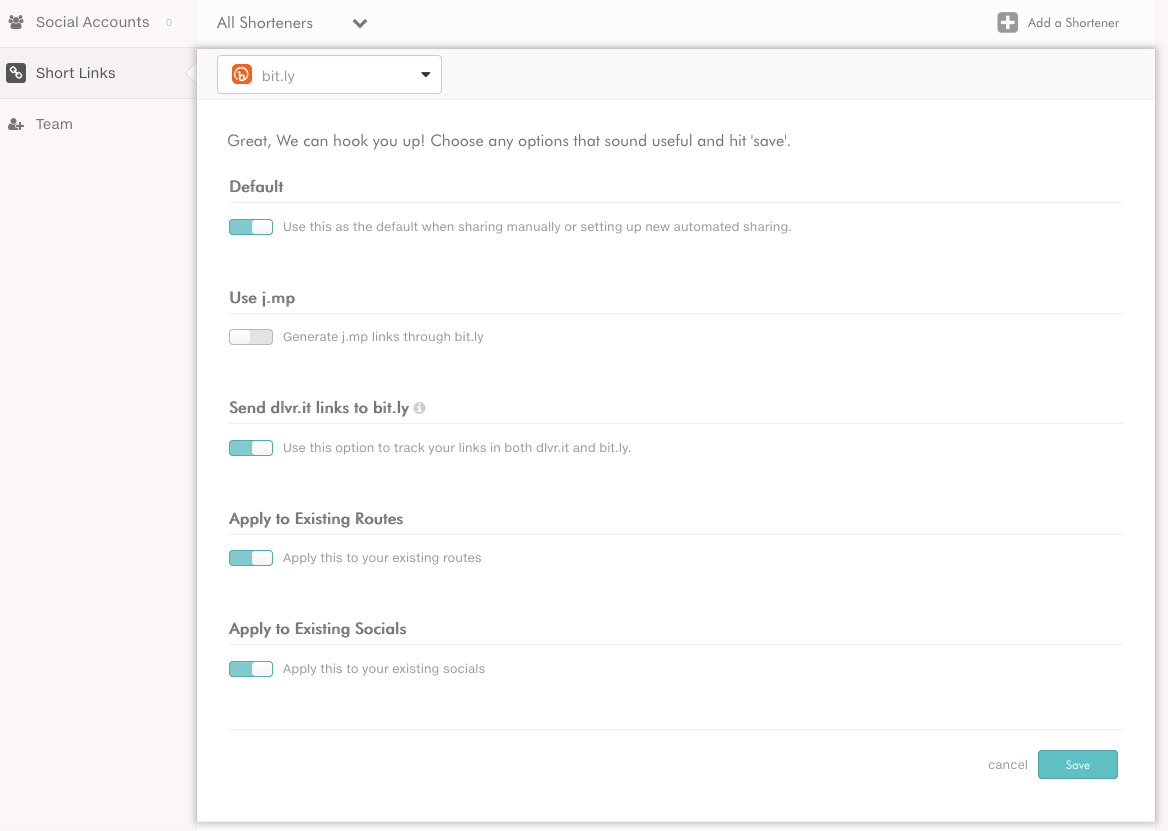
Personally, I use and recommend Bit.ly as a URL shortener. Using bit.ly as my selected shortener in dlvr.it allows the tracking data (such as link clicks) to be passed to bit.ly. This way, I see all my link clicks for posts in one place, and I like that. Bit.ly is certainly not the only choice as there are many others you can use. Walk thru the settings and authorize the URL shortener you prefer.
And That’s a Wrap…
I’ll test out some of the settings I haven’t played with yet, like curating content with dlvr.it and using the scheduling feature, and return with my analysis and recommendations soon.
I welcome you to set up Rocks Digital to feed to your social media accounts, and I’ve made it easy for you. This page provides the RSS feed URL for categories, specific contributors, or the entire blog. Now you can decide exactly what you want to feed (or whom), and can set it up quickly and easily.
What do you think about setting up an RSS feed to post to your social media accounts?